Updated the 18/04/2019
Version française: https://xiaomirobot.wordpress.com/error-13-no-not-charging-roborock-battery-motherboard-fuse/
Messages are accumulating on the forums about error 13. We will take a look at this breakdown, and bring some early days of the track.
First of all in terms of symptoms, the robot makes multiple round trips to its base, and ends up announcing an error 13 by remaining stuck at a load of 20-25%.
The difficulty of this error 13…… It is protean, the causes are multiple. To put it simply: everything between your power outlet and its battery can be the cause.
Nevertheless, apart from the classic case of dirty connectors under the robot, it would seem that an attack on the motherboard and in particular on a fuse present on the circuit is the first cause of this malfunction.
As a preventive measure, use a power strip equipped with a device to prevent overvoltages, it would seem that an overvoltage is a risk factor for reaching the motherboard.
We’re going to go from the simplest to the most complicated in terms of repair:
1- Check that the base connectors are clean
2-Check that the connectors under the robot are clean
3- Try to connect your robot with another Europe/China conversion plug (sometimes defective)
4- try a hard reset
-press and hold the left and right buttons (local cleaning and return to the base),
-Press the wifi reset button under the cover (Reset) and hold for 3-5 seconds.
-Release the wifi reset button, continue to hold the left and right buttons until the central button flashes quickly,
5- robot motherboard
Very frequent error break 13.
I will detail 3 solutions:
– repair the robot
– replace the motherboard
– replace the defective component
The company zooo.es offers to repair your robot . http://www.zooo.es/error-13-xiaomi-vacuum-roborock/
According to several testimonies, the costs would be in the order of 80€ excluding port.
It is possible to buy a new motherboard « Ruby S Main B v3 » :
Sold here for 119€ link 1 mediastore.de
or on express for 71€
Here is a video tutorial for its replacement: https://www.youtube.com/watch?v=QaxC8XSsSdE
Finally, the most satisfactory and inexpensive solution would be to replace the failed component. Provided you know which one….
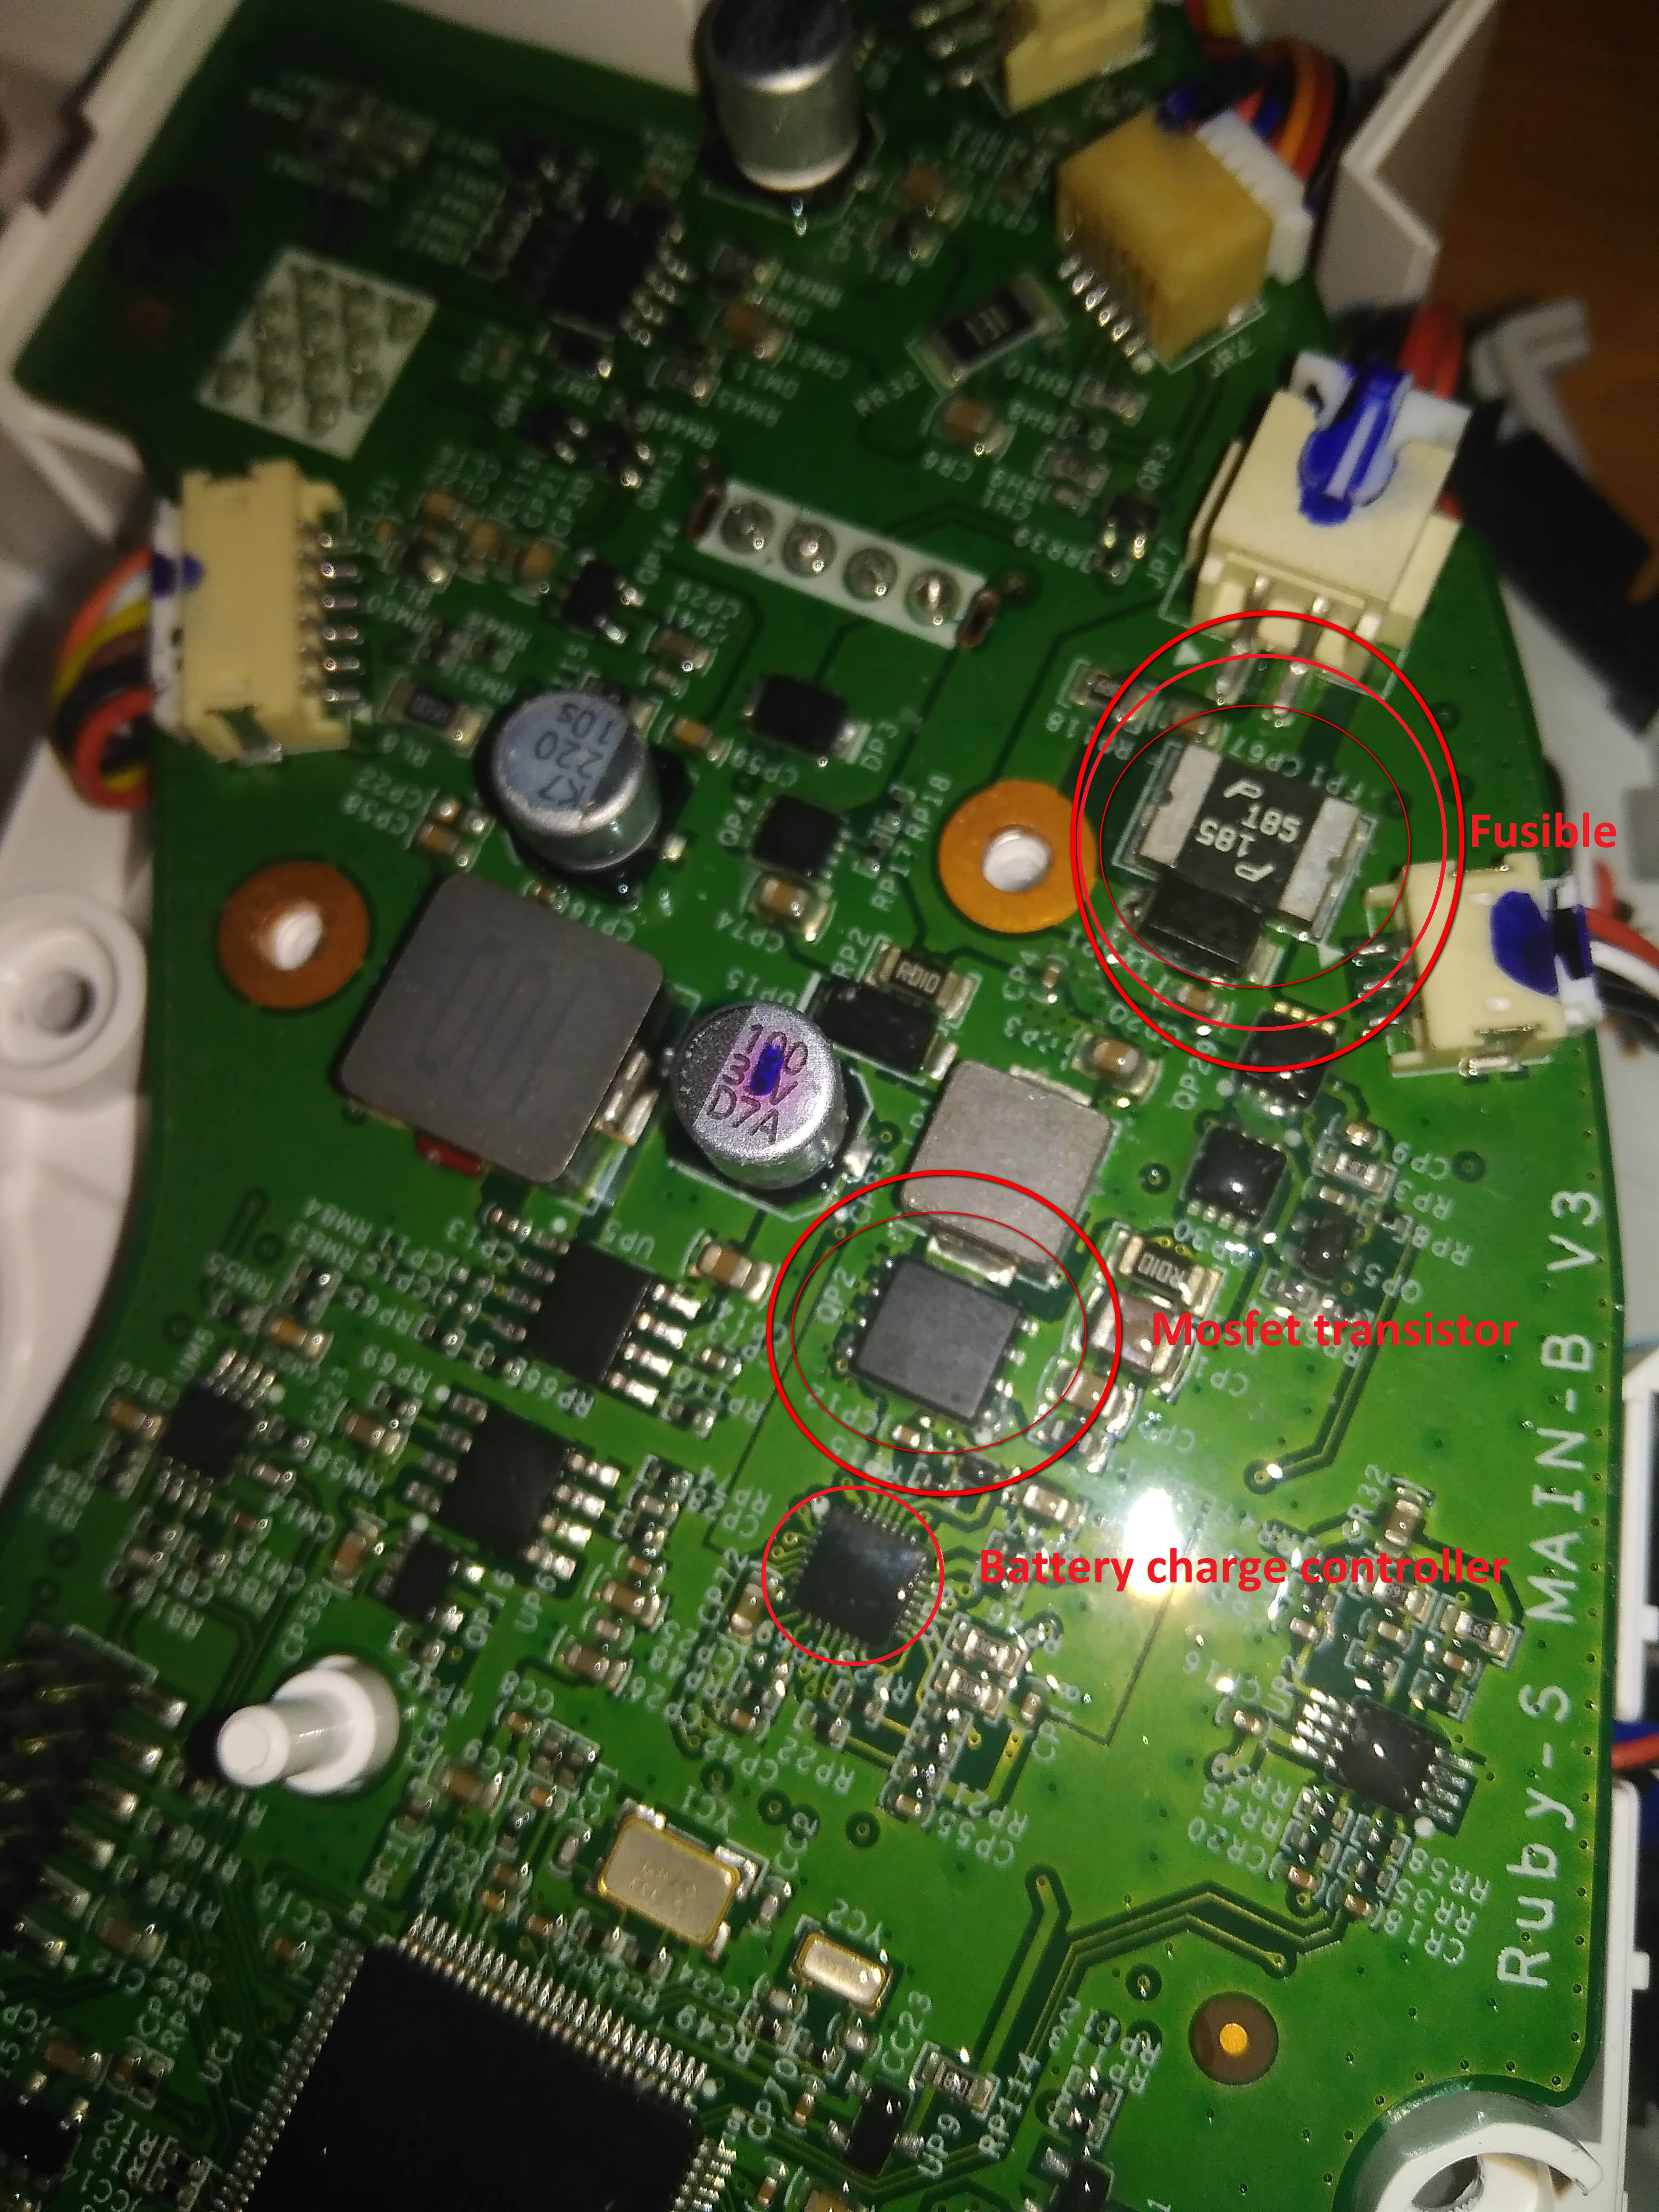
3 components are most likely to be affected: And in order of probability :
– Resettable fuse « P185 » : PTC resettable fuse (SMD2920P185TF)
– Mosfet transistor « B09N03 » (EMB09N03H) or « B09A03 » (EMB09A03HP) (2 different versions depending on the motherboards)
– Battery Charger controller MAX8731A (MAX8731AETI+) or BQ24773 (ref BQ24773RUYT) (2 different versions depending on the motherboards)
A again, the p185 fuse is by far the first protagonist involved in this failure
I therefore invite you to disassemble your robot in order to access the motherboard.
You can then perform a diagnostic test of the fuse which is very often involved:
It is enough to measure the resistance of the fuse. The theoretical maximum resistance is 0.150 ohm (cf docu). In case of much higher resistance (e. g. 0.5 Ohm), it is very likely that the fuse will be damaged. <While waiting for a new fuse, you can perform another test to confirm your suspicion. This test consists of shunting/shortening the fuse by soldering a wire between its 2 terminals and seeing if the robot starts charging. If that's the case, it's because he's the cause. This test will confirm a fuse problem, and may temporarily troubleshoot you. However, it is not advisable to consider this solution as definitive. Without fuse protection, you are exposed to a risk of overvoltage that could damage your roborock.
Once your fuse is received, you will need to solder the new one to the motherboard.
If unsoldering the original fuse proved too complex, it is possible to solder a new fuse in parallel (on the terminals of the previous one).
>Replacement video here
As we have seen, if the fuse was not involved the mosfet or battery charge controller are possible causes of motherboard failure… Nevertheless, I invite you to eliminate causes 6 and 7: battery and base before you start replacing them. (see below)
>Costs are in the order of a few euros:
Some links to order parts:
– Re-armable fuse « P185 » :(SMD2920P185TF) : original, compatible aliexpress, compatible ebay (theoretical characteristics: 1850mA (do not put more than 3000mA) Vmax 33v )
– Mosfet transistor « B09N03 » (EMB09N03H) : aliexpress /
« B09A03 » (EMB09A03HP) compatible RJK0389DPA
– Battery Charger controller aliexpress MAX8731A /
aliexpressBQ24773 (ref BQ24773RUYT)
6- check that the base works correctly
Use a multimeter to help yourself:
-without robot connected, measure base voltage . Theoretical at 4.3+-0.5V……. if different =base involved
-plug robot to base, measure voltage at base….. theoretical at 20+-2V
If this is not the case, a replacement base is available on aliexpress, gearbest or amazon… (from 25€)
ex : link 1 aliexpress
7- Check that the battery is working properly (5600mah and 14.4v)
Ideally, you should open the robot and access the battery and test it with a multimeter. <In case of a voltage lower than 13.5-14V it means that the battery is dead.
There are then 2 solutions:
-Replace the battery completely.
aliexpress purchase link (about 30€)
The change takes 10min (multiple video on youtube)
-Replace the defective cell(s) . It is then necessary to open the battery and check the voltage of each cell. And replace the defective cell by a 18650 cell. The costs are then less than 10€.
more help here: https://www.youtube.com/watch?v=FTKTn66z2eo
>/p>


